LinkWithin

Related Posts Plugin for WordPress, Blogger...

Friday, March 4, 2011

Back to Basics has a reason

So I just wanted to share the next project I'm working on (fear not the 205th are not dropped and I'll make some updates on them in the next week or two).

Tim (Dezartfox over at The Vanus Temple) and myself had a real hoot getting into the best army nominations and gaming together. So we have started planning our next doubles force. On my behalf I'll be entering with Ultramarines.... I know I know... But I've always enjoyed the crisp cleanliness of them and I want to turn my hand and messing these guys up with some weathering etc etc.

The plan is to go for a desert theme again as it will help the blue "pop" against the base, I have a handful of conversions / mini dioramas planned for my side of the force.

The theme is going to be of two forces joined together to combat the xenos threat of nids. 

So onto test colours. I really want to achieve a muted blue, that still manages eye catching, so I've gone into the Vallejo model colour range and also some model air as I'll be aiming to get these guys painted with the airbrush as much as possible. Here are the colours I've selected so far to trial:

VMC Dark Blue, VMC Ultramarine Blue, VMC Royal Blue, VMC Andrea Blue, VMC Deep Sky Blue, VMA French Blue and VMALight Sea Blue.

(VMC = Vallejo Model Colour, VMA = Vallejo Model Air)

painting basics

So my first port of call was to lay down some Primer. I use grey primer these days from the Vallejo Model Air range. Once the primer was dried I layed a solid base colour down using the airbrush and VMA French Blue. This is a really rich shade of blue, however it does have the "classic" cartoony look to it. Again once dried I then airbrushed a highlight using the VMA Light Sea Blue. This was the result.

painting basics

For me this was just a tad to "baby blue"... however it may work, once weathered. Though I didn't bother finding out. I reapplied the base colour and this time added a highlight using a 50:50 mix of VMA French Blue and VMA Light Sea Blue. Much better! from here I went a hit an edge highlight on using pure VMA LIght Sea Blue... Big mistake, it ended up looking messy:

painting basics

It's almost there, but the extra highlight was rather sloppily applied for an edge highlight and looked more of a bad line highlight. However, not one to consider myself a quiter I decided to see what it would look like with a little more colour added - This is messy, so please don't judge... I just wanted to test! 

painting basics

The white is the worst messy bit, but I decided I wasn't going to continue adding another 10 layers to get it smooth whenI could see the colours were just looking too cartoon.

back to the drawing board and to trial some of the other shades I have!

Back to Basics Pt2

So after finally getting round to finishing this guy or sort of finishing him, I took a few quick snaps.

I didn't go too far with this guy getting into the weathering etc as I know I can achieve that look. I'm relatively happy with this guy, though I think I can definately improve my edge highlighting technique!

Anyway here's a couple of snaps.

painting basics

painting basics

Anyway, comments on points to improve would be greatly appreciated :)

Thursday, February 24, 2011

Back to Basics

So after a really successful trip to the 40K Doubles held at Warhammer World, Dezartfox (Tim from no on!) and I have already decided on what we will be doing for our next attempt at the best army title.

What I felt after being in the nominations, was "was I really up to the level required... or do I have a shiny a Forgeworld Army". I think it was a blend of it being 1) Elysians 2) I painted them quite well... but not perfect and finally 3) I was with Tim, a previous best army winner with his Deathwing.

Obviously I have had the thought... Am I really good enough? I think personally the answer is no. Me and Tim have had a good chat about it and come up with a potential screamer of a problem. I currently paint at nearly arms length in an almost comical fashion, as when I hold it closer I struggle to see the model. The answer is possibly glasses. I'm going to try and arrange an eye test if I can this Saturday.

Aside from that, I've ever truly worked on ensuring I have a clean, smart and tidy paint job in my life. So after taking some inspiration from Ron (FTW) and Dave (N++ Wargaming) I decided to go "Back to Basics".

FTW Back to basics
N++ Wargaming Back to basics

So I present efforts so far... Smurf #1

This first image I have applied black undercoat, and base coat of 50:50 black and regal blue and then another layer of 50:50 regal blue and Ultramarines blue.

painting basics

In this second image I've appled line highlights of ultramarines blue, followed by an edge highlight 0f 50:50 ultramarines blue and space wolf grey. I've also notice I've taken some paint of the toes... Next lesson is painting on a handle.

painting basics

C&C welcome as this is going to all about improvement.

GW Doubles Nomination and my Army

Wahooo!!!!!!!!!!!!!!!!

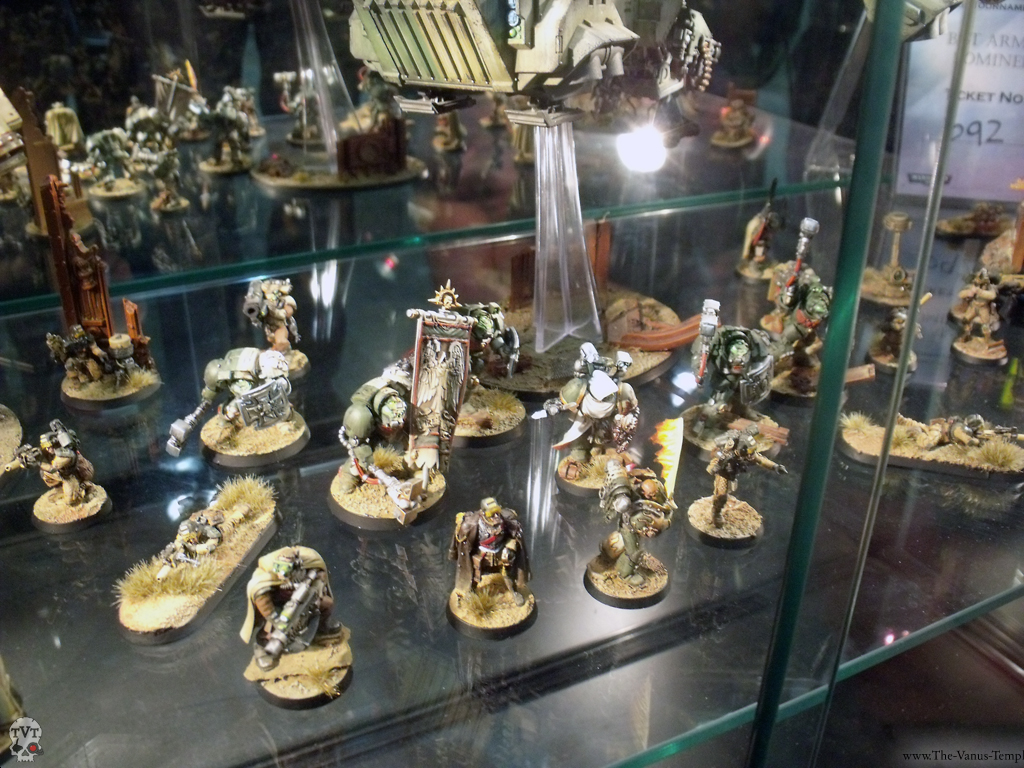
I recently went to the GW 40K doubles tournament held at Warhammer World. It's a great even, I absolutely love it and will be going back for more. Dezartfox over at the The Vanus Temple and myself took a combined force of Angels of Redemption and the plucky lads from the Elysian 205th Air Corps.

The force really worked well together as the Angels of Redemption were the real hitting power to the force and the guard ran distraction. It worked so well we managed to come 13th place from what I hear... not only that, but we got nominated for Best Army as well.

So here's some pics of our force in the freshly installed cabinets.

Army shot of elysians and space marines best painted nominees

Army shot of elysians and space marines best painted nominees

Army shot of elysians and space marines best painted nominees

Army shot of elysians and space marines best painted nominees

Army shot of elysians and space marines best painted nominees

And here's a few links to the blogs of the guys I went with:

The Vanus Temple
Marts Warhammer 40K Blog
The Rune of Stone

Sunday, February 6, 2011

Nerd Splurge!!!!!

Wow, I went down to the exhibition held by my local war-games club today. It's an event called Vapnartak. It's a great little event for finding the occasional little gem.

Vapnartak is predominantly a historical war-games event, however games such as 40k and warmachine have been worming their way in. So much so that the 40k tournament being held there, managed to garner the prime spot!

Is was originally going to attend the tournament; a great little 1,000pts compt'd event. However, I had the opportunity to go to a comedy gig the night before.

So I popped down to see how the tourney was progressing and consider buying some Pegasus terrain... If it was there.

That's when what I can only describe as madness hit me. It's something that I think is a dormant beast residing within all gamers. I call it Nerd Splurge!

Basically, the average gamer turns into a spending idiot because they are at an event, with little or no thought of the repercussion.

So what was the result of my Nerd Splurge.

The blue crystal chessex dice.


Incursion - I have considering this for awhile.


Posh static grass... Though thus stuff is awesome


Shot of what you get with a paint pot for scale... It's double sided as well.


And a shot of it on a base.


Vallejo varnishes, matte medium and glaze medium


Vallejo fluro paints and my attempt to find and an alternative to brazen brass


So there we go... Did I need any of it? No! Am I chuffed with the result? Yes. Do I regret it? Partially, but I'll get over that.

So tell me about you Nerd Splurges.

Tuesday, February 1, 2011

Small update Valk interior weathered

So here's a quick update. I've been working on getting models up to scratch for going to doubles. My fellow team mate is Dezartfox over at the vanus temple. He's running a blood angel list and taking a storm raven with him.

We've come to the decision that it's not going to be killer all comers list that can handle everything... though we will look cool. Or as cool as nerds with lots of toy planes can be :)

So this was the interior at 10.00pm last night.


After creating a wash using graveyard earth and mig weathring powder made fluid with screen wash concentrate... no water added ;) then apply to where you want the dust to be. I then dried it with a hot air blower. I then use a stiff drybrush to "dust" where the dried paint pigment was, blending it in.


Same again, but with a desert coloured pigment. The key to the weathering is layers, as is always with painting models. Another key point is variation in colours and shades... in my opinion anyway.


I've also added a key bit of bare metal as well. I went to the great expense of sourcing the best weathering pigment in a metal shade... scrapings from a pencil :)

Rub my finger in it and them where I want bare metal applied.


The boys relaxing before they are dropped into battle.


And a token exterior photo.

Wednesday, January 12, 2011

Elysian Troopers and Valkyrie weathering

Just wanted to post a quick update of my progress for the GW Doubles Throne of Skulls additions. All I need to do to my force is these 4 snipers ready for the command squad and weather the Valkyries.

So here are the Snipers. finished, but require the addition of a single bipod leg that dropped off during undercoating.


Weathering of the valks. I've taken pictures through the process to try and give you a bit of an idea to my process of weathering.

So far the models have been base coated, panel highlighted, decals, sponge weathered (I'll do a tutorial on this once I'm past doubles :) ) and had Klear (Future) airbrushed over them. Alway 2 coats to begin with as the first layer soaks into the under lying paint. I should also note this is the old formula of Klear I have used.


This is the inside of the valk. I've not gone crazy with painting details in here as most of the time the top will be closed. Again base coat, sponging and varnished with Klear.


So using a wash created with oil paints and white spirits (Lamp Oil Black + Burnt Umber), this wants to be quite thin... but not too thin - (Once you get using it it's quick to understand). Too Thin, colour doesn't show enough but critical it spreads quicker than hot butter. Too thick and the mix won't flow.

What we are looking to achieve is a consistency where if you load your brush and touch a recess you see the paint start flowing through the cracks, crevices and nooks without spreading where you don't want it.

Here's the interior with the wash starting to bee applied. If you look closely you'll see where the mix wasn't quite right. Though it's not the end of the world as we can go back with a cue tip moistened with white spirits.


And the roof of the valk, you gan see around the details at the bottom of the image where the wash has flowed and where I was also a bit sloppy with application.


And here is the start of the exterior. I took a shot of the wing after flowing the wash into all of the details.


And here is a shot of the wing after using a soft flat brush moistened with white spirits and dragged along the wing. After progress times passing from front to back on the wing, I finally got too this position. I'm quite happy with this and I'll replicate across the whole model.


Once I have done that I'll lay down another thin layer of klear with the airbrush to protect this layer before applying small streaks of white paint to do the same streaking effect. After the white, I'll just touch up and of the recesses that might have white paint flowed into them.

So that's it for the time being. I'll get some more shots tonight / tomorrow hopefully.