Monday, June 27, 2011
1500pts Elysians IA8
Labels:
1500pts,
40000,
40k,
air cavalry,
army list,
Elysians,
krom_stormbrow,
Warhammer
Sunday, June 26, 2011
Tauros Venator Diorama
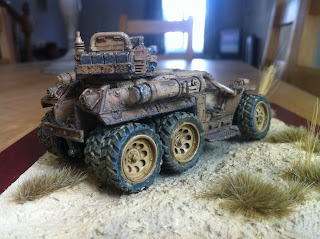
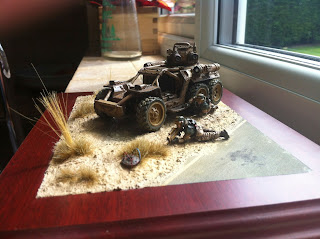
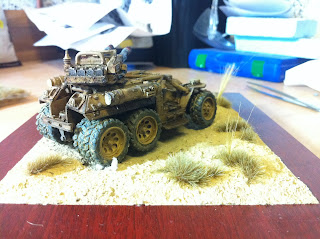
Well I finished the diorama on Saturday and went and entered it at the local GW store. I wasn't completely happy as I painted the guys on Friday night / Saturday, but hey I did all this in to weeks.
the pictures aren't perfect and when I receive the model back I'll take some better ones. I took a couple before these where the lighting was even worse, but I loved the way it add quite a bit of drama with the shadows.
So I'm generally pleased with it all however, I felt I rushed the two troopers and I think it shows... I also think that effected the results of the competition as well as I came second out of three of us. And this is the winner. It is excellenty executed however something about it rings of something I've seen before by Keith Robertson (Heavy Metal painter) though I can't find pictures. None the less it was very well produced and a worthy winner.
Oh well better luck next time... and must try harder!
the pictures aren't perfect and when I receive the model back I'll take some better ones. I took a couple before these where the lighting was even worse, but I loved the way it add quite a bit of drama with the shadows.
So I'm generally pleased with it all however, I felt I rushed the two troopers and I think it shows... I also think that effected the results of the competition as well as I came second out of three of us. And this is the winner. It is excellenty executed however something about it rings of something I've seen before by Keith Robertson (Heavy Metal painter) though I can't find pictures. None the less it was very well produced and a worthy winner.
Labels:
40000,
40k,
air cavalry,
diorama,
Elysians,
krom_stormbrow,
tauros venator,
Warhammer
Wednesday, June 22, 2011
Elysian Diorama to date
So rather than post too much waffle... I did that earlier today I'll just post some pics of the diorama to date.
These are WiP, such as the image #4 has a wheel raised off the floor :( This will always be difficult as I'm aiming to be able to use this model for gaming as well.
Thanks for looking and if you have any questions, please fire away!
These are WiP, such as the image #4 has a wheel raised off the floor :( This will always be difficult as I'm aiming to be able to use this model for gaming as well.
Thanks for looking and if you have any questions, please fire away!
Labels:
40000,
40k,
air cavalry,
diorama,
Elysians,
krom_stormbrow,
tauros venator
Day whatever in the diorama building house
Soooo, this regular posting I was going to do whilst doing this diorama seems to have gone out the window!
I have been working on it pretty much every single evening and trying some new techniques... I even bought myself another airbrush for the heady cost of... £20. It's become my new staple airbrush now. Its a simple dual action gravity feed airbrush, no adjustments can be made to it, so it's free of all the usual baggage and weight. I simply control air pressure with my air valve (connects the airbrush onto the hose) and amount of paint by how far I pull my finger back.
It looks a little like this, but with a smaller capacity paint chamber (about 2cc I believe) and a red housing at the back.
I'm quite pleased with where I'm at, I tried applying rust staining with acrylics. This worked much better than expected, normally I would use enamel and oil paints for this as they can be feathered and adjusted with thinners easily. With the acrylics I added a whole bunch of drying retarder to the paint, this enabled me to do similar as I would previously, but create the feathering and effects with just water! Always a bonus.
I also applied a heat damage style effect to the lascannon muzzle. I tried this before with my valkyries, but it failed. I could never work out why... until last night when it all worked, due to the lascannon muzzles being matt this time and gloss previously.
To explain a little further, the technique is achieved by airbrushing layers of inks (red, purple, blue and black - in that order) to achieve a banded spectrum look about it... similar to how a stainless steel exhaust looks on a motorbike. The reason it failed before was I tried applying the ink onto a gloss surface and it immediately beaded away from the surface. This time as the surface was matt, it stayed in control and where i placed it.
So onto to tonight when I'm going to stay priming the models that are going on the base, I should also have mentioned I've changed the theme from roadside checkpoint to roadside IED.
Thanks and feel free to ask away :D
I have been working on it pretty much every single evening and trying some new techniques... I even bought myself another airbrush for the heady cost of... £20. It's become my new staple airbrush now. Its a simple dual action gravity feed airbrush, no adjustments can be made to it, so it's free of all the usual baggage and weight. I simply control air pressure with my air valve (connects the airbrush onto the hose) and amount of paint by how far I pull my finger back.
It looks a little like this, but with a smaller capacity paint chamber (about 2cc I believe) and a red housing at the back.
So onto my diorama stuff. In the image attached the tauros venator is almost complete, I need to just add pigments and oil effects.
I'm quite pleased with where I'm at, I tried applying rust staining with acrylics. This worked much better than expected, normally I would use enamel and oil paints for this as they can be feathered and adjusted with thinners easily. With the acrylics I added a whole bunch of drying retarder to the paint, this enabled me to do similar as I would previously, but create the feathering and effects with just water! Always a bonus.
I also applied a heat damage style effect to the lascannon muzzle. I tried this before with my valkyries, but it failed. I could never work out why... until last night when it all worked, due to the lascannon muzzles being matt this time and gloss previously.
To explain a little further, the technique is achieved by airbrushing layers of inks (red, purple, blue and black - in that order) to achieve a banded spectrum look about it... similar to how a stainless steel exhaust looks on a motorbike. The reason it failed before was I tried applying the ink onto a gloss surface and it immediately beaded away from the surface. This time as the surface was matt, it stayed in control and where i placed it.
So onto to tonight when I'm going to stay priming the models that are going on the base, I should also have mentioned I've changed the theme from roadside checkpoint to roadside IED.
Thanks and feel free to ask away :D
Labels:
40000,
40k,
air cavalry,
Elysians,
krom_stormbrow,
tauros venator
Thursday, June 16, 2011
Day Three in the diorama building house
So I got back into the garage last night to continue working on the diorama. I didn't get too much done as I spent a good 30 mins cleaning and reassembling my airbrush after a really big deep clean.
Once that was done I lay done a dust layer to the tarmac section and more of a colouring layer to the earth. Utilising lighter shades to add dusting to the sand. I then made a different earth works mix, made out of plaster, gulf war sand, beach sand, light dust, a smidgen of europe dust, a splosh of some VMA sand shades, a splash of VMA white and lashings of vallejo matt varnish. I made this into a real putty like mix and smeared and tapped it all over my sand area.
This is quite an exciting project for me and I hope your enjoying following along. Any questions regarding the techniques etc, I'm more than happy to help.
Laters Krom
Once that was done I lay done a dust layer to the tarmac section and more of a colouring layer to the earth. Utilising lighter shades to add dusting to the sand. I then made a different earth works mix, made out of plaster, gulf war sand, beach sand, light dust, a smidgen of europe dust, a splosh of some VMA sand shades, a splash of VMA white and lashings of vallejo matt varnish. I made this into a real putty like mix and smeared and tapped it all over my sand area.
Once this was one, I threw done a few different shades with the airbrush in the troughs that have ben created by wheels. Just to add a little more shape and texture to the base.
Obviously once that was done I got far too excited with myself and mocked up the venator onto the base.
And here's a few close ups of the decals on the venator.
This is quite an exciting project for me and I hope your enjoying following along. Any questions regarding the techniques etc, I'm more than happy to help.
Laters Krom
Labels:
40000,
40k,
air cavalry,
diorama,
Elysians,
krom_stormbrow,
tauros venator
Tuesday, June 14, 2011
Day two of building my first diorama
Wowser... so soon I here you say???? Well the posting boob was all my fault and I apologise for that.
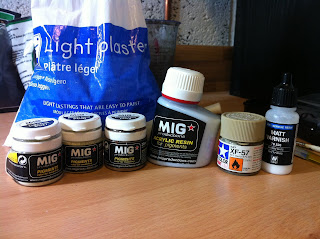
So onto the ultra cool and exciting stuff :D I received a package in the post today containg a few new cool items: Mig Acrylic Resin, Mig Thinners for washes, Mig Pigment fixer: Some great sanding boards, Tamiya putty and some Mig brown for desert filter.
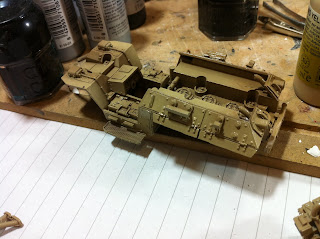
So I've applied some filter to the chassis and parts of the Tauros Venator, but I didn't take pics as the difference isn't too noticeable by camera. Basically th filter works very similar to a glaze and is applied to alter the hue of the model, rather than shade it.
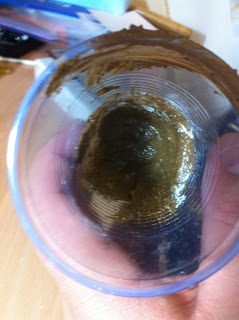
I also got onto doing the ground works for the base as well. Using a mix of plaster, Mig acrylic resin, matt varnish, Mig Gulf war sand,beach sand, light dust and europe dust I made a sickly looking paste/mix
Yeah, don't worry, it does look like I've had a botty accident in the plastic cup, but I do assure you it is the mix from above... Oh I also added tamiya buff paint and some model scenics medium buff ballast.
Then using an old paint brush I painted / stabbed this onto the base.
Looks like cool wet mud at the moment, but it is drying a nice colour. Tomorrow I plan to lay a dust coat down with the airbrush before adding another small amount of mix with a litter colour to it and alternative mix formula.
In addition to this I also applied gulf sand pigment to the wheel before applying pigment fixer in a circular motion towards the centre of the wheel hub. I'll take phtos of this tomorrow so that the full effect can be seen.
Until tomorrow night.
Krom
Labels:
40000,
40k,
air cavalry,
diorama,
Elysians,
krom_stormbrow,
sculpting,
tauros venator,
Warhammer
My first steps into diorama buildng
Well it's been ages since I posted last... Again! I'm really starting a theme here for this blog. So, why've I bothered posting? Well Pottered into my local GW this Saturday to spend a gift voucher (thanks mart)... I got a sky shield incidentally.
After having a chat with the staff, I found out they do a monthly painting comp. Turns out this month is dioramas.
My first reaction was to not bother, but after going and eating some scran (corned beef pasty!) I decided I would join in. I raced to the nearest trophy store so that I could get a plinth.... With that bought I went to the model shop and grab some more supplies.
I realised I better go and check for rules and deadlines. Eek, the only rule was... There are no rules and the deadline was 2 weeks!
So, I got on with the task in hand. I've already developed a partial name / theme: roadside check point.
So here are a few wip pics.
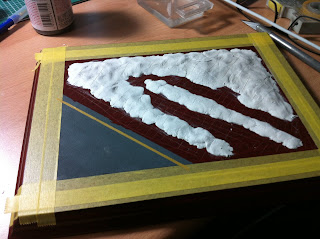
Wooden plinth base with Das modelling clay added for structure and also Tamiya diorama texture paint (pavement effect dark grey) painted on for the road.
The beast to be the feature of the diorama. Been meaning to get one of these painted for ages, I've got another one to build and the lesser Tauros (Big thanks to blueronin and his crew for this beauty :D)
The awesome wheels! prior to weathering... this is rather experimental as I've never created rubber wheels before
And here is a little detailing added to the tarmac. A simple addition of Iyanden darksun foundation paint applied between a set of masks.
I'll be posting another set straight after these were meant to be last nights images... but i had an incident where I left my laptop in the middle of the street for an hour before I realised... Mart from Marts Warhammer Blog went and collected it for me.
Any comments and questions please fire away, and I'll be more than happy to help/answer where possible.
Krom
Labels:
40000,
40k,
air cavalry,
diorama,
Elysians,
krom_stormbrow,
sculpting,
tauros venator,
Warhammer
Subscribe to:
Posts (Atom)


